Wednesday, 18 February 2015

High Fashion Contract Make-Up

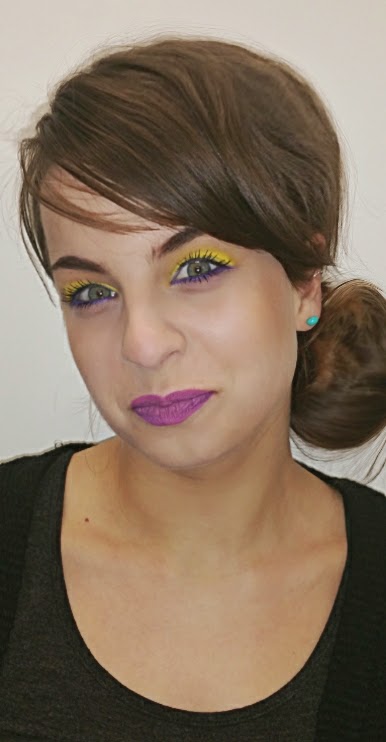
This is Branka's demonstration for High Fashion contrast Make-up! Amazing. 


This is my first time doing high contrast makeup.
I loved it and I definitely gained confidence
with mixing colours to create high contrast, 
clean and sharp Make-up.

Products used: 

Cleanse,Tone,Moisturiser
Clown White
M.A.C. Studio Fix
Kryolan loose translucent powder
Collection EB Kit - brown mixed with a small amount of black
Kryolan Lip Rouge mini Palette 18 Colors
Inglot-Glam Eye Shadow palette
Yellow
Purple
Vaseline
SUNKISSED Glimmer Compact


To start with I have cleansed, toned, and moisturised my model's skin. 

Picture 1

I then applied clown white on the upper eyelid up to the eye socket. 
This is the first time I used clown white and its amazing, the result you get, how it changes the pigments of the colours and turns it to high contrast.
I then used yellow from Inglot-Glam Eye Shadow palette.

Picture 2

Again from Inglot-Glam Eye Shadow palette, I used a lighter shade of Purple on the lower eyelid. 
I blended the sharp yellow edge with Ben Nye-
Glam Eye Shadow palette 
Shell Natural
just to get rid of that sharp edge and give it a blended look.  

Picture 3

For foundation I used M.A.C. Studio Fix - a very little amount, mainly covering the 
T-zone and I blended it all over the face and neck to give me that smooth natural finish.
To set the foundation I used
Kryolan loose translucent powder.
For the cheeks I used SUNKISSED Glimmer Compact with rose Bronze beautiful pigment 
for this look.
For the lips and eyebrows I used
Collection EB Kit - brown mixed with a small amount of black. For the Lips I used
Inglot Free system Lipstick Matt 519


And to finish the look off I used a very little bit of Vaseline, just on the cheeks, nose and head to give it a healthy, dewy glow

Picture 4


Picture 5

Picture 5

Based on the overall outcome, I was very pleased with myself.
A few things, however, that I need to work on...the lipstick balance wasn't 100% and the lower lip line wasn't balanced - the right side was much lower.
Also, the yellow eye shadow needed to be 
more blended.


Sleek, Smooth Ponytail converts to a Bun

 Ponytails have been around since the beginning of mankind. Images of the earliest cavemen and women indicated that they tied their hair back with various "natural" pony holders such as vines, soft twigs or pieces of animal fur.


Since those caveman days the ponytail has evolved and changed through many civilizations and historical periods.

The ancient Egyptians, both men and women, 
of all ages, wore their hair in a variation of ponytails to keep the intense heat off of their necks and faces. The early Greeks and Romans also wore a version of pulled back strands akin to today's ponytail hairstyles.

Products:

Comb
Hair 
Tail comb
Teasing backcomb brush
 Patrick Camerons Hair Ties
Elastic hair ties
 Paddle brush 
Bobby pins
Bobby waved hair pins
Crepe hair 
(To add volume and texture)


Step by step:

To create a sleek, smooth ponytail, start off by holding the hair where you want to create the ponytail.
Smooth out the hair using your Teasing backcomb brush or paddle brush,
still holding the ponytail - make sure you have good tension. I find it easier to 
smooth out the bottom-back of the hair using the Teasing comb as its the more tricky part, so a little water and/or hair spray
(which I personally prefer) will do you good too.
Once you're happy with the ponytail, using Patrick Camerons Hair Ties, place a hair grip on each end to create pony tails. I love this method because it gives you perfect tension and a smooth finish.
I used hair spray to smooth out all the loose ends with the tail of the Tail comb.


Converting a ponytail to a bun


Using a hair net, fill it up with hair crepe for the desired volume.
Wrap the hair net around your ponytail to create a bun shape and using bobby waved hair pins secure it in the right position with good tension. 


Neatly smooth down the end of the hair all the way around the bun using the teasing comb and tuck it under the bun, fastening with bobby pins.


Using hair spray, smooth out the hair around the bun even more, and to finish it off, use crepe hair in a different colour 
(I used blonde) to add style and effect.


I wrapped the crepe hair around the bun as an accessory.

I was extremely happy with the end result 


My own creation


I got the idea for this style when I opened the bun.
I just simply kept the ponytail but removed the crepe hair that filled the inside of the hair net.
I back-combed the ponytail, and back-rolled it, then secured it with bobby pins. I used the crepe hair to add texture and style...